
Getting started with veriQU
Last updated: November 8, 2026
veriQU checks the AWS account that runs your SaaS product against the requirements of the AWS Foundational Technical Review (FTR), tells you what is blocking you, and helps you remediate it. This guide walks through every step, from subscribing to submitting your FTR to AWS.
Two things to know before you start. First, veriQU prepares you; it does not submit anything to AWS for you, and AWS alone decides whether your FTR is approved. Second, some steps change your AWS account. Scanning never does. The one-click remediations, the draft Well-Architected review and, on veriQU Continuous, the daily automatic remediation do, but only when you create their CloudFormation stacks yourself, in your own account.
The path at a glance
| Step | What you do | Where |
|---|---|---|
| 1. Subscribe | Subscribe in AWS Marketplace and create your veriQU login | AWS Marketplace, then the veriQU console |
| 2. Connect | Register your AWS account and deploy the read-only assessment role | veriQU console and AWS CloudFormation |
| 3. Scan | Start a scan and read your report | veriQU console |
| 4. Remediate | Remediate the blocking items, with one-click remediations where offered, then scan again | Your AWS account |
| 5. Answer | Answer the items only a person at your company can answer | veriQU console |
| 6. Prepare | Finish your Well-Architected review and the plans FTR asks for | AWS Well-Architected Tool and the documentation pack |
| 7. Submit | Request your FTR | AWS Partner Central |
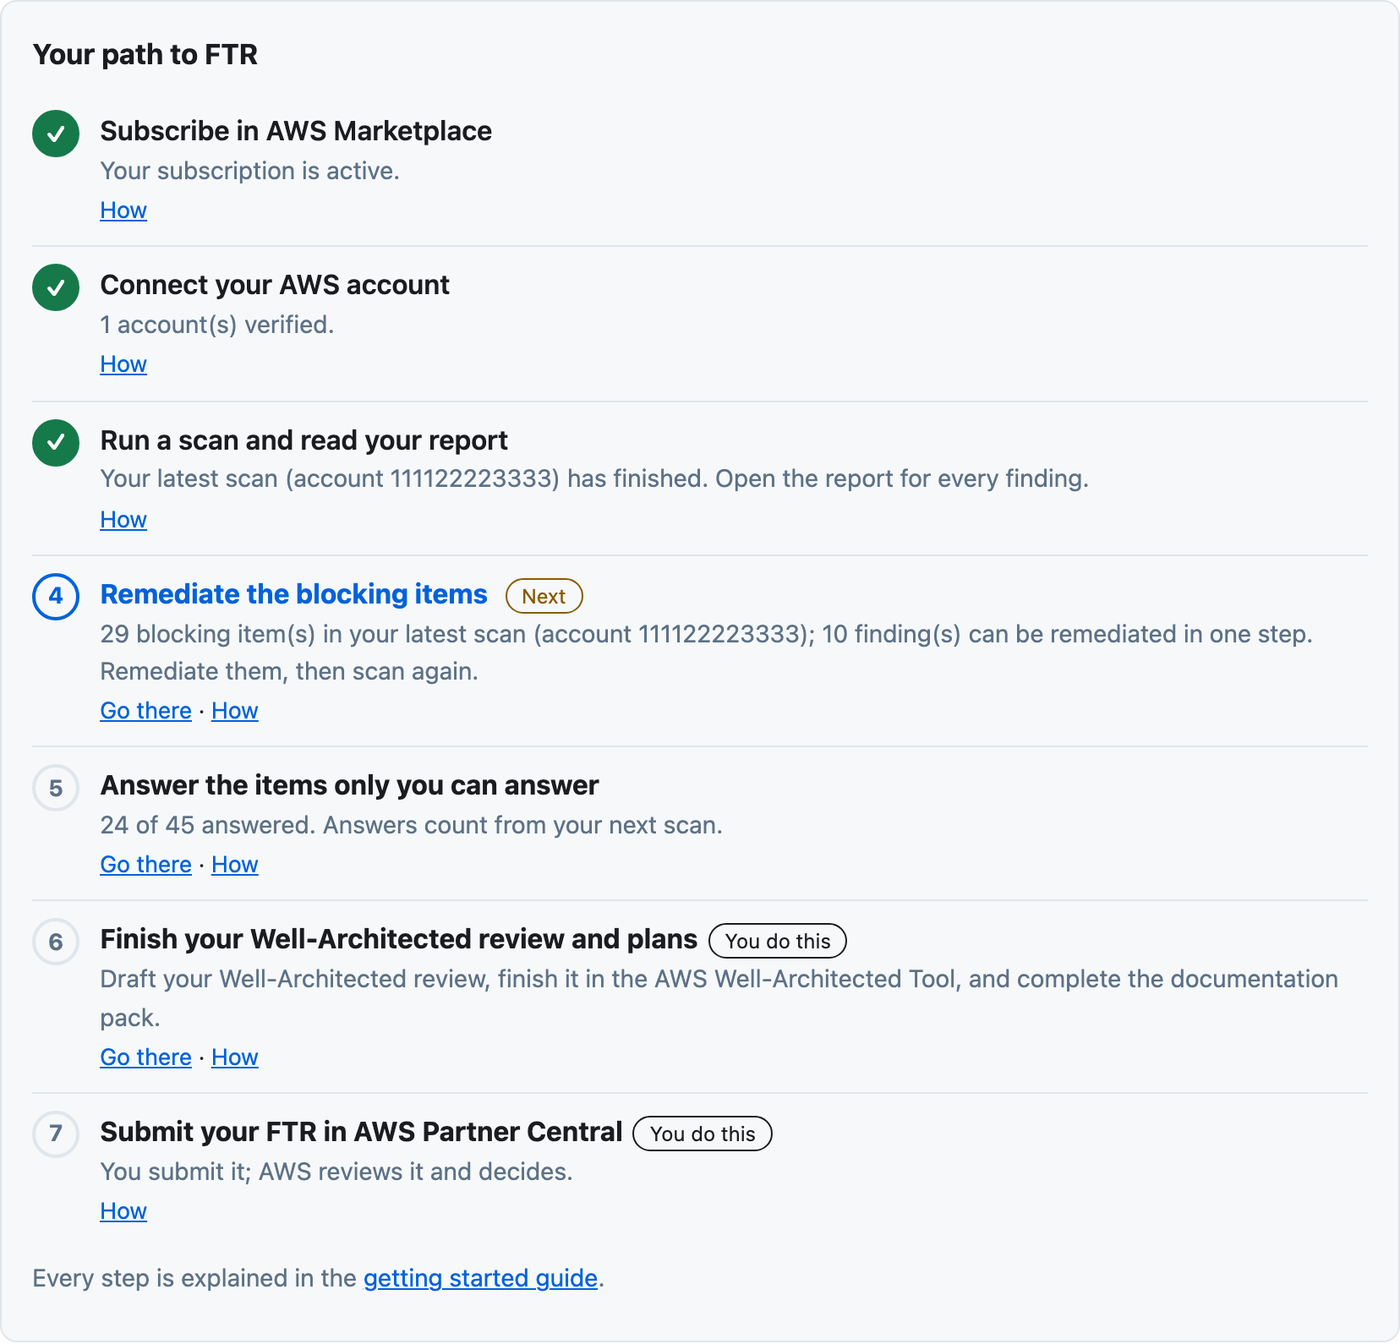
The checklist at the top of the veriQU console, Your path to FTR, shows which of these steps you have finished and what to do next.
What you need
- Administrator sign-in to the AWS account that runs your product. veriQU calls this the account to assess.
- If your AWS Marketplace listing belongs to a different AWS account, administrator sign-in to that account too. veriQU calls it the seller account.
- Access to AWS Partner Central, where your solution is listed and linked to your AWS Marketplace product.
- The name of your solution exactly as it appears in AWS Partner Central.
Step 1. Subscribe and sign in
- Subscribe to veriQU on AWS Marketplace. AWS handles all billing; veriQU never asks for payment details.
- AWS Marketplace sends you to the veriQU registration page. Enter a work email address for scan results and service notices, and choose Continue to the console.
- Create your veriQU login. Signing in for the first time links the login to your subscription.
Already set up? Sign in at the veriQU console. If you lose your setup link, open your subscriptions in AWS Marketplace, select veriQU and choose Set up your account.
Step 2. Connect your AWS account
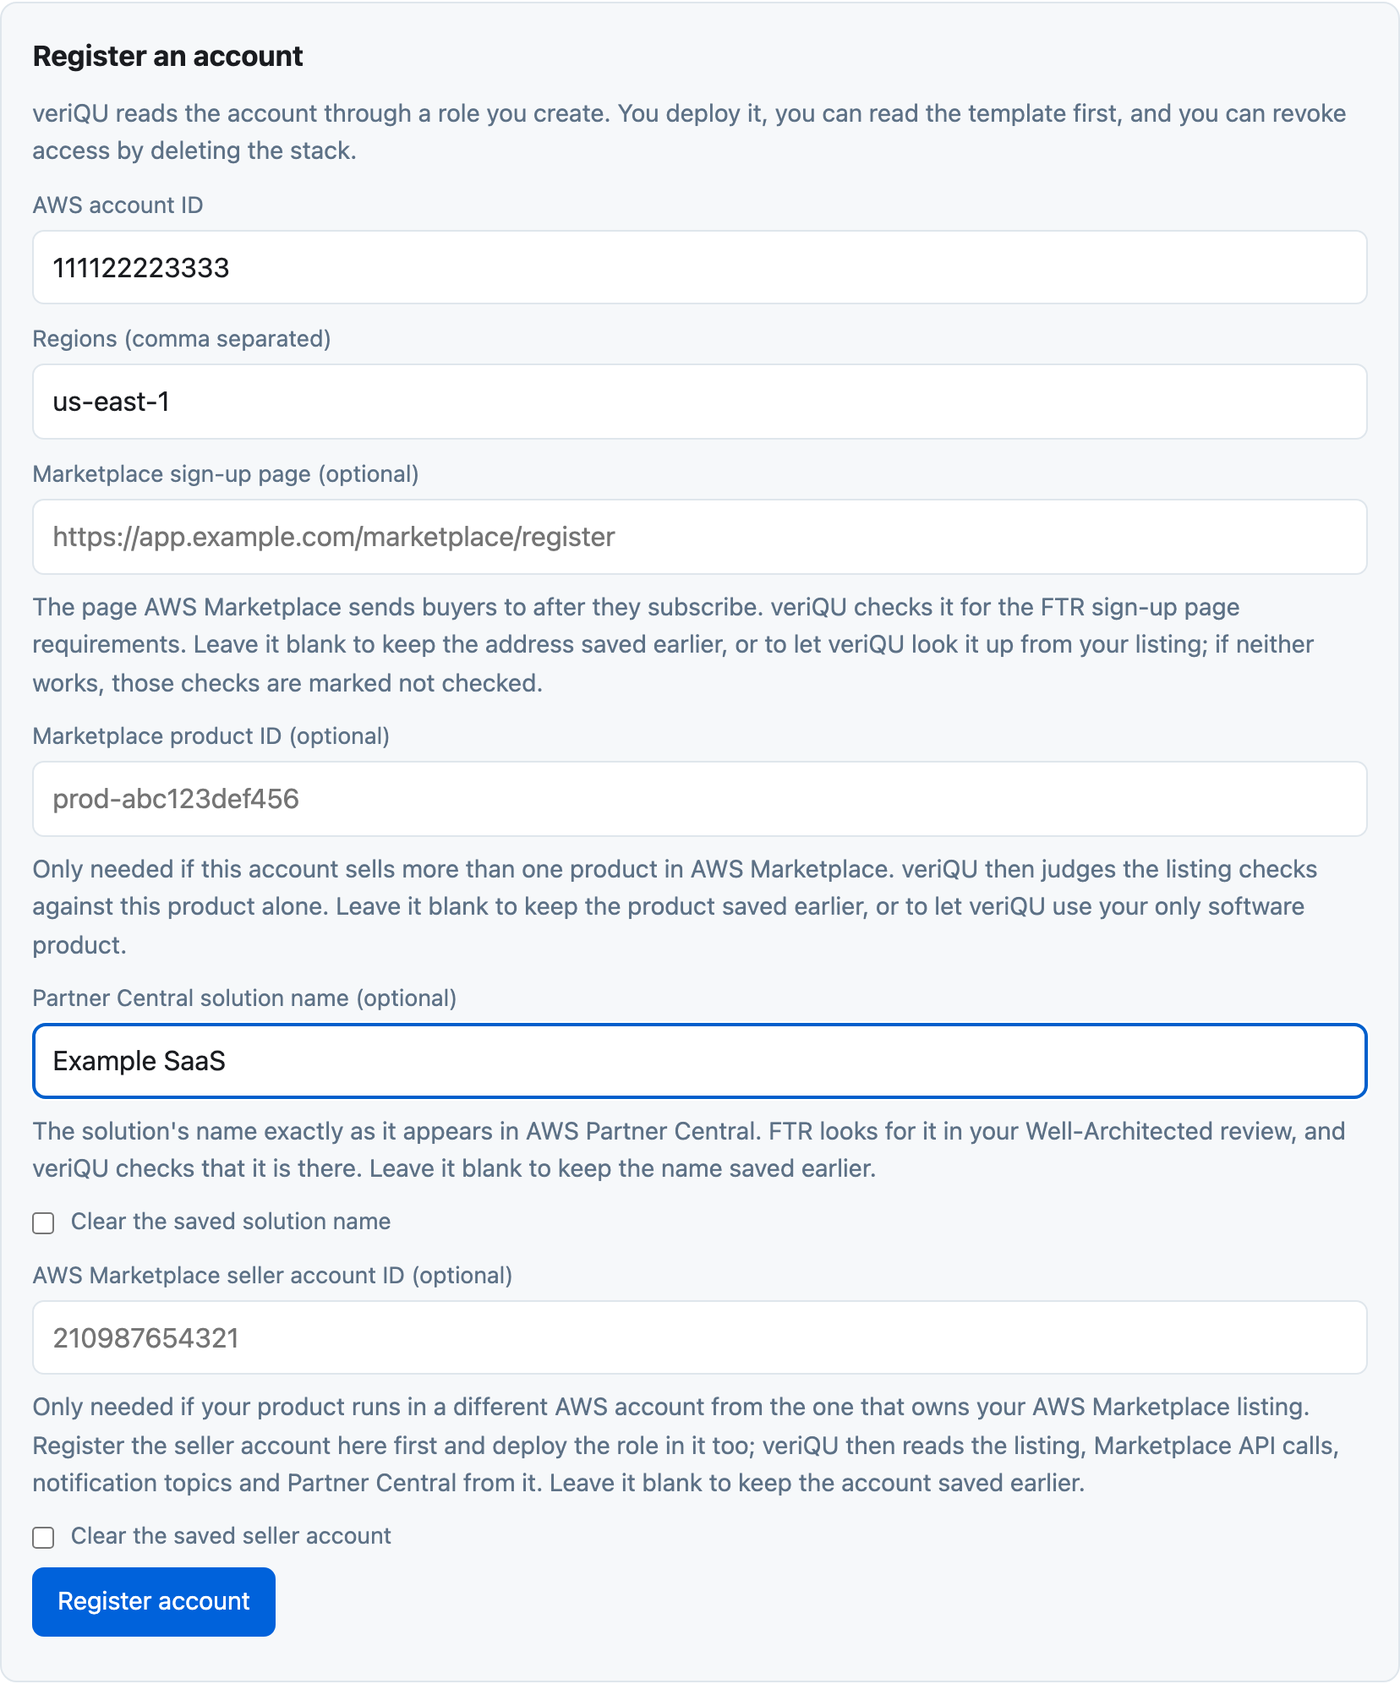
Register the account. In the console, under Register an account, enter:
- AWS account ID: the 12-digit ID of the account that runs your product.
- Regions: the Regions your product runs in, separated by commas, for example
us-east-1. Not sure? In the AWS console, open a service your product uses, such as Lambda, EC2 or ECS, and read the Region name at the top right. Pages such as AWS Marketplace and IAM show "Global" there because they are not tied to a Region; Global is not a Region you can scan. - Partner Central solution name: optional, but enter it. FTR looks for this name in your Well-Architected review, and veriQU checks that it is there.
- AWS Marketplace seller account ID: only if your listing belongs to a different account. Register and connect the seller account first, then name it here.
The other optional fields (Marketplace sign-up page, Marketplace product ID) are only needed in the cases their descriptions name. Choose Register account.
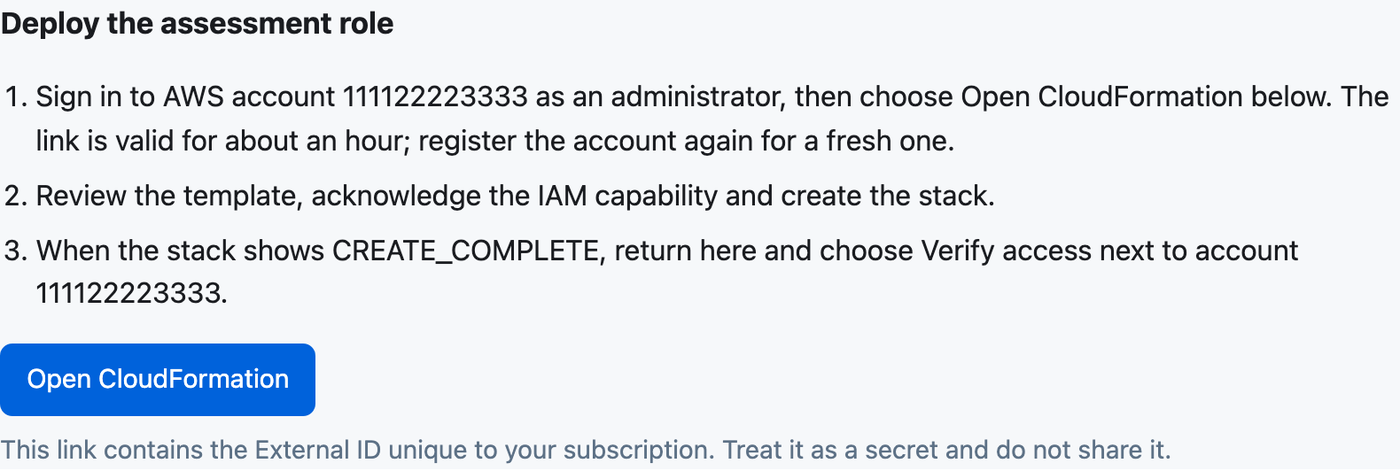
Deploy the assessment role. The console then shows Deploy the assessment role.
- Sign in to the AWS account you registered, as an administrator.
- Back in the veriQU console, choose Open CloudFormation. It opens the CloudFormation create page in your account with the template and your subscription's External ID filled in. The link works for about an hour; register the account again for a fresh one. Treat it as a secret.
- Review the template, acknowledge that it creates an IAM role, and create the stack. Wait until the stack shows
CREATE_COMPLETE. - Return to the veriQU console and choose Verify access next to the account. It shows Verified when veriQU can use the role.
What the role can do. The stack creates one IAM role, veriQU-Assessment. It can read how your AWS resources are configured. It cannot change your resources, and it is explicitly denied from reading your stored data: S3 objects, DynamoDB items, Secrets Manager and Parameter Store values, SQS messages, Lambda code, and KMS decryption. Only veriQU's AWS account can use it, and only with your External ID. To revoke access, delete the stack. The full list is in What veriQU creates in your AWS account.

Step 3. Run a scan and read your report
Choose Start scan next to a verified account. Most scans finish in about a minute; a large account scanned in several Regions can take several minutes. When the scan finishes, choose Open report.
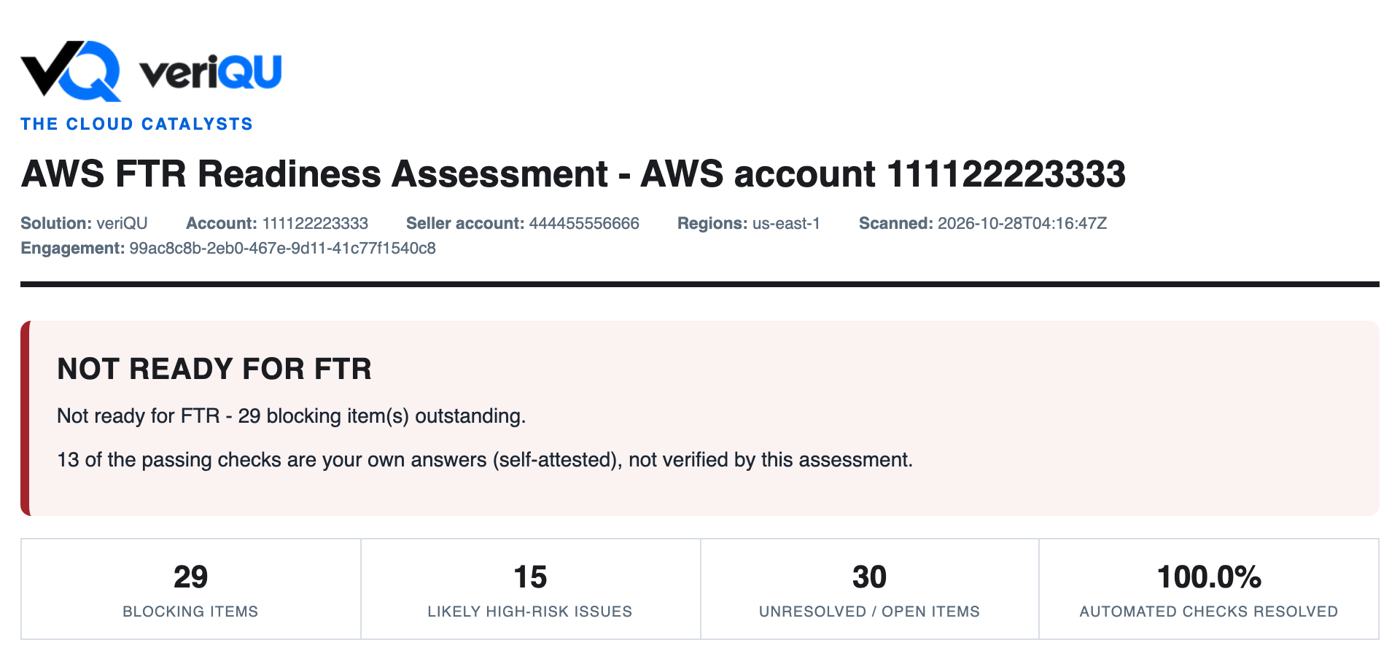
The report opens with a verdict and four counts:
- Blocking items: findings that would stop your FTR. Remediate these first.
- Likely high-risk issues: findings likely to appear as high-risk issues in your Well-Architected review.
- Unresolved / open items: checks no scan can settle, which a person at your company must answer (step 5).
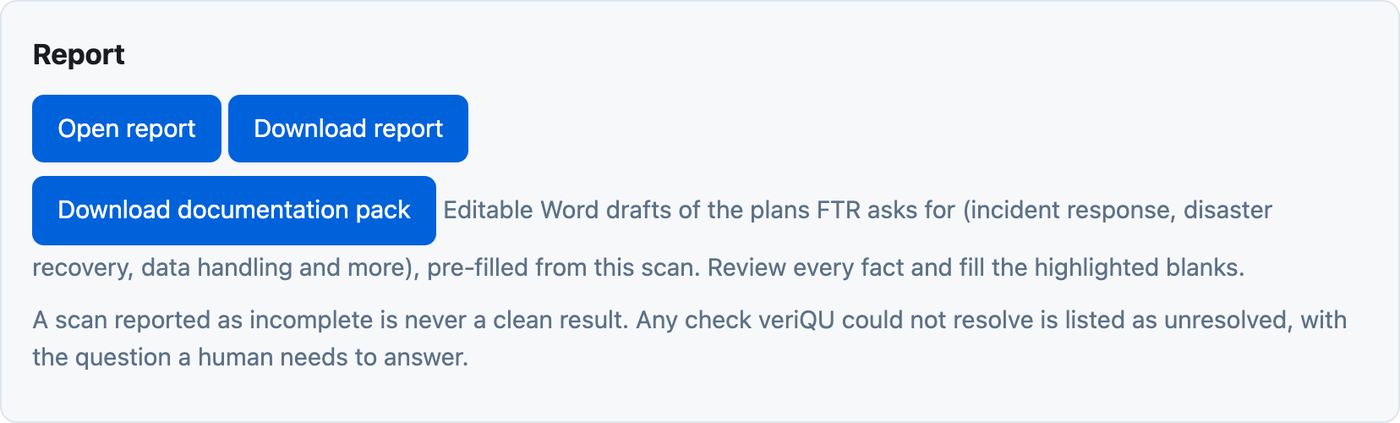
- Automated checks resolved: how much of the scan completed. A scan that did not complete is never a clean result; any check veriQU could not resolve is listed as unresolved.
Every finding says what FTR requires and what veriQU found. On veriQU Assist, each one also says how to remediate it. Download report saves a copy.
On veriQU Assist (the paid plan), the Report section also has Download documentation pack: editable Word drafts of the plans FTR asks for, such as incident response, disaster recovery and data handling, pre-filled from your scan. Review every fact and fill the highlighted blanks.
Step 4. Remediate
Work through the blocking items first, in the order the report lists them.
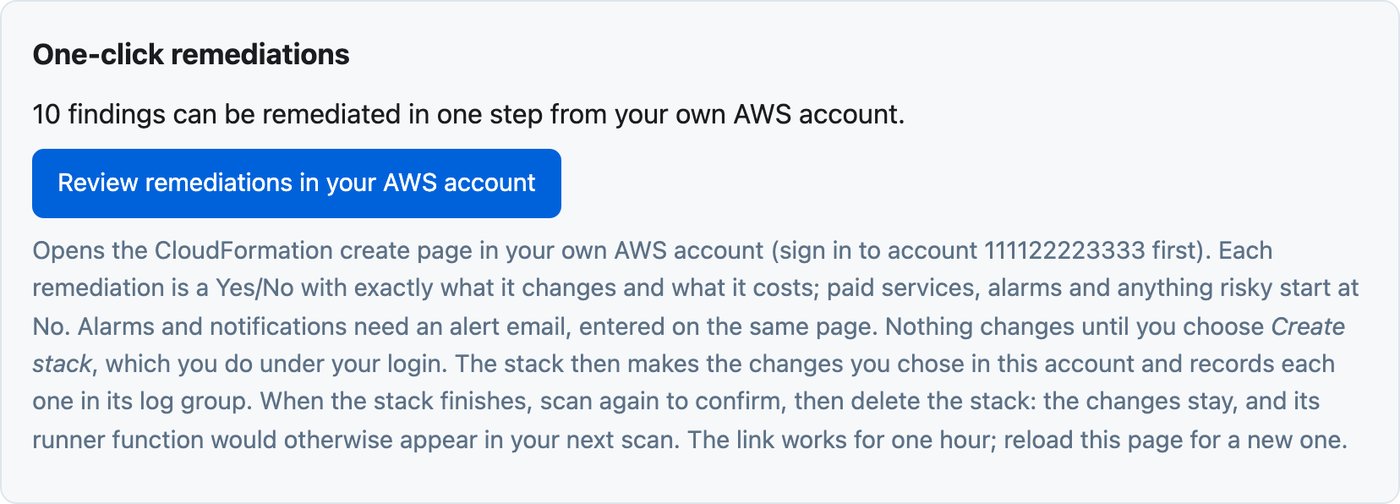
One-click remediations (veriQU Assist). When some findings can be remediated automatically, the console shows One-click remediations.
- Sign in to the AWS account the scan covered.
- Choose Review remediations in your AWS account. It opens the CloudFormation create page in your account. The link works for one hour; reload the console for a new one.
- Each remediation is a Yes or No parameter. Its description says exactly what it changes and what it costs. Paid services, alarms and anything risky start at No. Set the ones you want to Yes. Alarms and notifications need an alert email, entered on the same page. You can choose Preview instead of Apply to see what would change without changing anything.
- Create the stack under your login. The stack then makes the changes you chose in your account. Each change is recorded in the CloudWatch log group
/veriqu/fixes-apply-<id>in your account, kept for 365 days. - When the stack finishes, scan again to confirm. Then delete the stack: the changes stay, and its function would otherwise appear in your next scan. On veriQU Continuous, if you left the daily automatic remediation on, keep the stack instead: deleting it stops the daily pass. See Keep remediations in place.
Everything else. Remediate the remaining findings yourself, following each finding's remediation guidance in the report (veriQU Assist). Some need a configuration change in your AWS account; some need a written policy or plan; some are settings in AWS Marketplace or AWS Partner Central.
Scan again. Each scan shows what is still open. On veriQU Assist you can scan as often as you like. On the free scan you get one scan every 90 days.
The scheduled check (veriQU Assist and veriQU Continuous). You do not have to remember to rescan. veriQU scans each verified account on its own and emails you whether it is still ready and how the number of blocking items compares with your last check. With veriQU Assist, an account is checked when it has not been scanned for 30 days. With veriQU Continuous, the accounts covered by the daily automatic pass are checked when they have not been scanned for 7 days, so your documents follow the account; any other accounts are checked every 30 days. The email never lists findings; the report is in the console. The console shows when each account's next check is due. The scheduled check pauses for an account that has had no successful scan and no verification for 90 days; choose Verify access to resume it.
Keep remediations in place (veriQU Continuous)
On veriQU Continuous, the remediation stack from step 4 can also keep the remediations you approved in place. Once a day, a function inside that stack checks each one and remediates any that has changed back. It runs in your account, under the stack's own role, which can change only the settings you turned on, send the alert email and write its own logs. veriQU still has no write access to your account.
If your contract covers more accounts than it covers with veriQU Continuous, the daily pass is offered for as many accounts as your Continuous quantity: the first ones you verified, in the order you registered them. The other accounts keep everything in veriQU Assist.
The daily pass is set by three switches on the same CloudFormation page as the remediations, under Automatic remediation:
| Switch | Starts at | What it keeps in place |
|---|---|---|
AutoRemediate (Keep these remediated automatically) | Yes | The free, low-risk remediations you set to Yes. This switch also turns the two below on or off. |
AutoRemediatePaid (Also keep paid services on) | No | The paid services you turned on, such as GuardDuty. Turning one back on restarts its charges, so leave this at No if anyone switches them off to save money. |
AutoRemediateReviewed (Also keep reviewed changes in place) | No | The changes you turned on under Review before turning on, such as a security group closed to the internet. Anything that relied on the old setting breaks again each time, so leave this at No unless those changes must hold. |
Each switch's description lists the remediations it covers. Only remediations that can tell an unchanged setting from one that changed back are included, so a day with nothing to do changes nothing and sends nothing. The daily pass needs Mode set to Apply and an alert email.
What to expect. Each run that remediates a setting, or fails to, emails your alert email with what it changed. The daily pass remediates changes made on purpose too: before you undo one deliberately (for example turning off deletion protection to delete a database), set AutoRemediate to No. Every run is recorded in the stack's log group, /veriqu/fixes-apply-<id>.
Keep the stack. The daily pass lives in the stack, so keep it after it finishes. While it is on, the stack keeps a function, its log group, a daily schedule, the alert topic and that topic's encryption key in your account; AWS bills you for them at its standard rates, and the encryption key is billed monthly. To add the remediations from a later scan, change the stack name on the CloudFormation create page so this stack stays as it is.
To stop it. Update the stack in CloudFormation with its current template and set AutoRemediate to No, or delete the stack. The remediations already made stay in place either way.
Step 5. Answer the items only you can answer
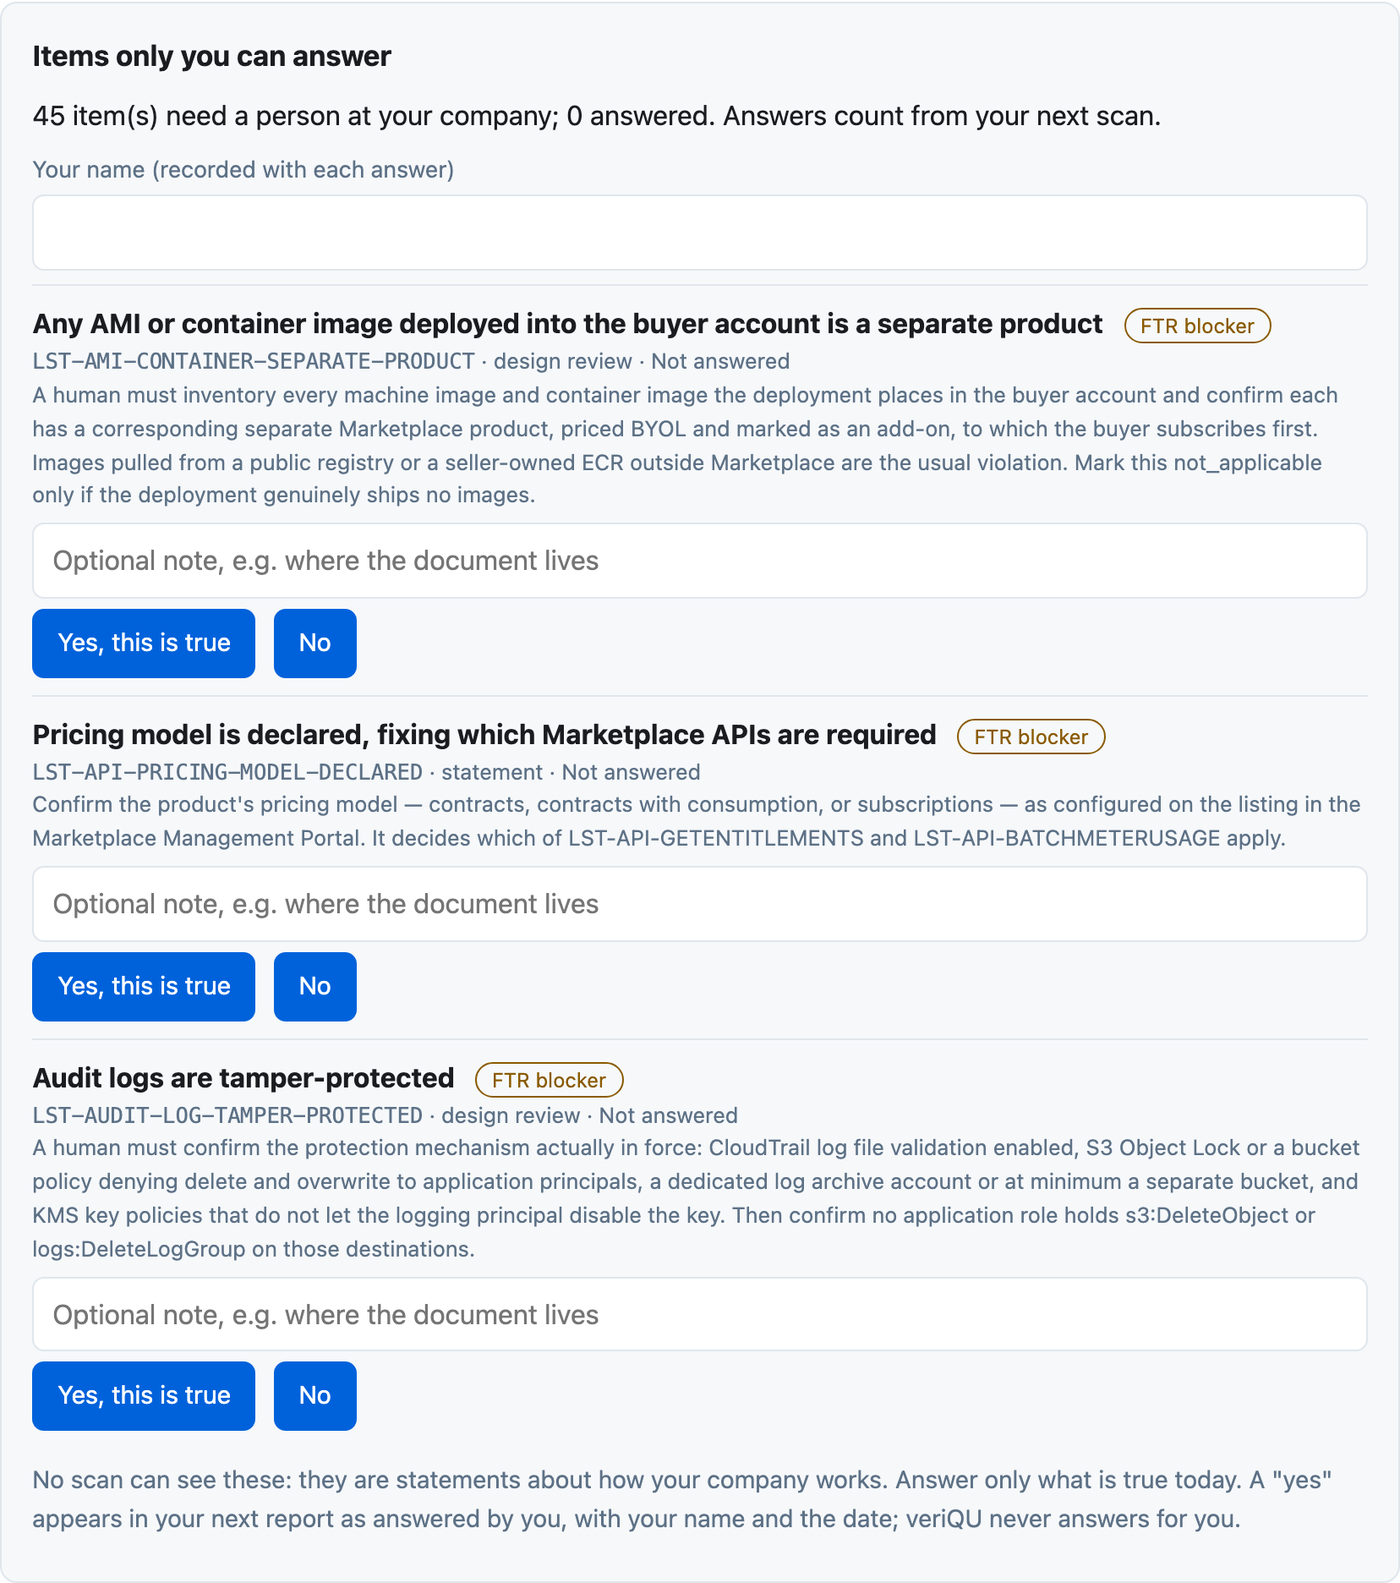
Some FTR requirements are statements about how your company works, which no scan can see, such as having an incident response plan or a tested recovery procedure. They appear in the console under Items only you can answer.
- Enter your name once. It is recorded with each answer.
- For each item, read what it asks. Choose Yes, this is true only if it is true today, and add a short note about your evidence. Choose No if it is not true yet, and come back when it is.
- Answers count from your next scan. Your report labels each one as answered by you, with your name and the date. veriQU never answers for you.
Step 6. Prepare your evidence
FTR is approved on evidence you upload: a Well-Architected review with no high-risk issues in the Security, Reliability and Operational Excellence pillars, or a SOC 2 Type II report. Most partners without a current SOC 2 Type II report use the Well-Architected review, which is free and self-service in the AWS Well-Architected Tool.
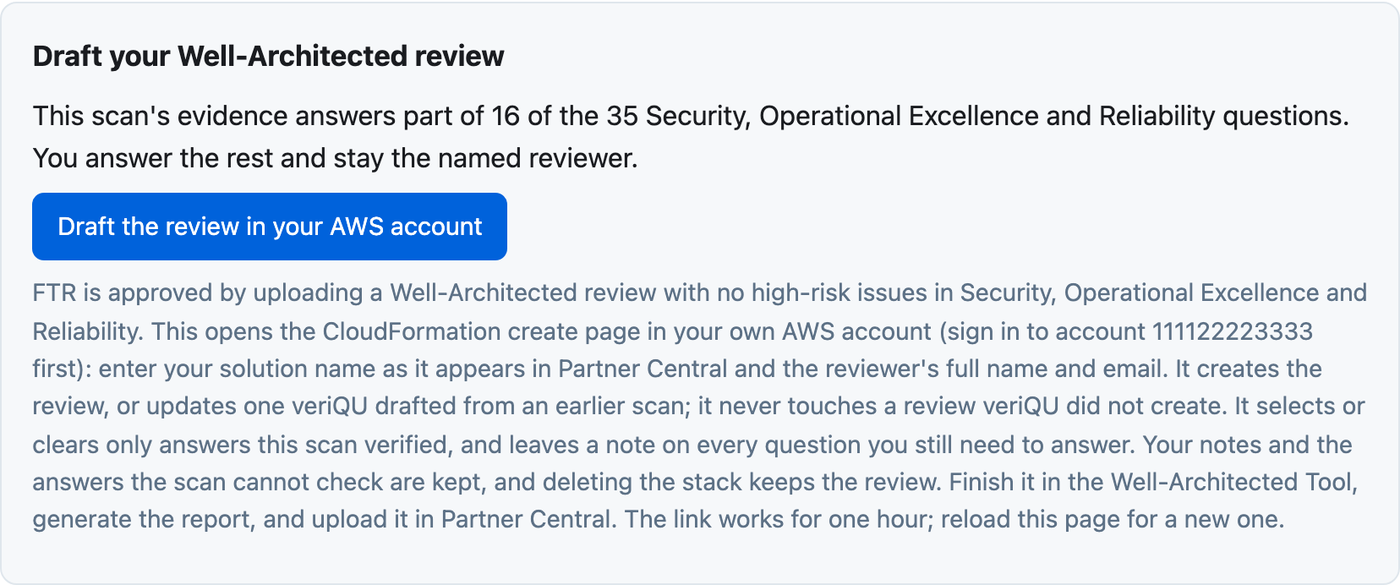
Draft your Well-Architected review (veriQU Assist).
- Sign in to the AWS account the scan covered.
- Under Draft your Well-Architected review, choose Draft the review in your AWS account. It opens the CloudFormation create page in your account.
- Enter your solution name exactly as it appears in AWS Partner Central, and the reviewer's full name and email. Create the stack.
- The stack creates a Well-Architected workload, or updates the one veriQU drafted from an earlier scan. veriQU answers only what your scan verified and adds a note to every question you still need to answer. You stay the named reviewer.
- Finish the review in the AWS Well-Architected Tool. Answer every remaining question truthfully, and resolve every high-risk issue in Security, Reliability and Operational Excellence.
- Generate the review's report (a PDF) in the AWS Well-Architected Tool. This is the file you upload in step 7.
The plans FTR asks for. Use the documentation pack from step 3 for your incident response, disaster recovery, data handling and other plans. FTR reviewers can ask to see them.
Step 7. Submit your FTR
You submit the FTR in AWS Partner Central; veriQU cannot submit it for you.
- In AWS Partner Central, open your solution and its Validation tab.
- Choose Refresh and check that every prerequisite shows as complete. veriQU's report lists the prerequisites it can check, such as the solution being linked to your AWS Marketplace product.
- Request validation and upload your Well-Architected report from step 6, or your SOC 2 Type II report.
- AWS reviews your submission and may send questions. The approval decision is AWS's alone.
These Partner Central steps are as we found them when submitting veriQU's own FTR in November 2026. Partner Central can change; if a button has moved, the AWS Partner Central documentation has the current steps.
Troubleshooting
| What you see | What to do |
|---|---|
| Verify access says AWS refused to let veriQU assume the role | Check, in order: the stack exists and shows CREATE_COMPLETE in the account you registered; you created it from the console's Open CloudFormation link, not from a copied template; the External ID was not typed by hand. If in doubt, delete the veriQU-Assessment stack and create it again from Open CloudFormation. |
| The role requires MFA | The veriQU template never requires MFA, so the role was changed after it was created. Delete the veriQU-Assessment stack and create it again from Open CloudFormation. |
| That role belongs to a different AWS account | The stack was created in another account. Create it in the account you registered, or register the account it is in. |
| The session could not call AWS | A service control policy in your organization is the usual cause. Check for one that denies STS or restricts Regions for this account. |
| The Open CloudFormation link no longer works | It is valid for about an hour. Register the account again for a fresh link. |
| The scan did not complete | Open the partial report: it names the checks that could not run and why. Scan again; if it happens again, email us with the scan ID. |
| A finding looks wrong | Email us with the scan ID and the check ID. Do not answer an item yes to clear it. |
| No one-click remediations or draft review appear | They are part of veriQU Assist, and appear only when a scan finds something they cover. |
| The daily automatic remediation emailed that it remediated a setting | Someone or something changed that setting back. If the change was deliberate, set AutoRemediate to No on the remediation stack, then make it again. Scan again to confirm where you stand. |
| The daily automatic remediation emailed that something failed | The email names the setting and the error. Remediate it by hand or run the scan again; email us with the scan ID if it keeps failing. |
| A later scan's remediation stack will not create | The name veriqu-fixes is already taken by the stack you kept. Change the stack name on the create page. |
Getting help
On veriQU Assist, choose Ask veriQU in the console to ask what is blocking you, what a finding means, or what to do next, in plain English. It answers from your own scan and this guide. It cannot change anything in your account or in veriQU.
Email info@thecloudcatalysts.com. We reply within one business day. Include the scan ID shown in the console; it is also the session name veriQU uses in your CloudTrail, so we can trace the scan.